The Definitive, No-BS Guide to Increasing Conversions (PHASE ll)
With the baseline established, you can have confidence in the data and the tracking methods. This means you are ready to begin activating tools to gather the information needed to develop personas/avatars and identify possible conversion-stopping factors.
 Step 4: Tool Setup
Tool Setup Checklist The tool setup is dependent upon budget, timeframe and the amount of data required to achieve success. If all allow for the best possible solution, establish either Google Tag Manager (GTM) or Google Analytics (GA).
- Google Tag Manager
- Events
- Mailto Event
- Link Click Listener
- Send Social
- Google Analytics (Classic)
- Google Universal Analytics
- Google Adwords Remarketing
- Facebook Like
- Form Submit Listener
- Download PDF event
- Download MP3 event
- Download MP4 or movie event
- Listen to MP3 Event
- Watch video event
- Form Submission (one for each form)
- Rules
- All pages
- Outbound Link event
- Click to call Event
- Download PDF Event
- Social Interaction sent
- Form submitted event (one for each form)
- Macros
- Ones already existing for GTM
- Google Analytics
- Tracking Code
- Form Errors
- 404, 505 pages & 301 redirects
- Site Errors
- Web, Exit, Purchasing experience Surveys (Qualaroo)
- A/B & multivariate testing tools (optimizely)
- Heatmap and Scroll map Tracking (User Testing)
- Live Chat (LivechatInc)
- Form Analytics (Formisimo/Hotjar)
 Step 5: Website Walkthrough
Website Walkthrough Checklist With your tools in-place, conduct a thorough website walkthrough completing both a heuristic analysis and quantitative analysis at the same time (separating the two can be difficult).
During the walkthrough, look at each page of the site and get a feel for the flow. Carefully record detailed notes on issues. At this point, it is important to remain aware of your own biases – avoid trying to make the data fit your assumptions about the site.
As you walk through the site, answer the following questions:
- Does the site work in all browsers for key journeys?
- Does the site work on all devices for key journeys?
- What is the user experience like on every device, including key journeys? (I recommend using Hotjar Camera tracking for this)
- How is the URL structure & handling setup?
- How does the site navigation work? Is it logical?
- Are there suspicious items that may require further analysis?
- Are URLs shared or split?
- How does a user’s first impression of the site differ based on their origin (social, organic, paid and direct)? How do each of these key users flow through the site? What is their journey?
- How does the copy sound? Could it be improved?
- Do the Opt-in and CTA’s stand out?
- Is the value proposition easily identifiable?
Record all of the gathered data on the walkthrough checklist. At the end of the process, provide the results to the Project Manager or client.
 Step 6: Usability Analysis
Usability Analysis Checklist With the website walkthrough complete, it is time to dig into the Usability Analysis. Providing visitors with troves of valuable information, great deals or an amazing product will do nothing for your bottom-line if your site is difficult to use.
The usability of your site is impacting your conversion rate – either positively or negatively. – Click to tweet
Wondering why visitors are leaving your site? Here’s some insight:
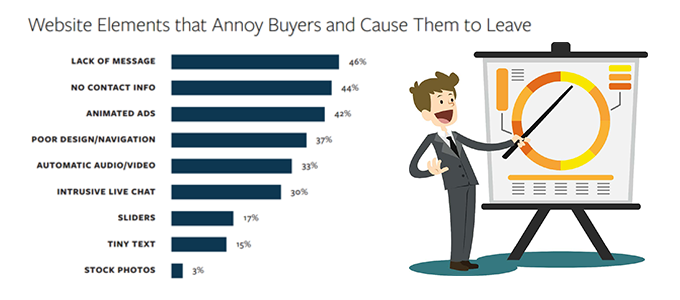
And it’s not just about content either, loading speeds are also critical. KoMarketing reported that 75% of survey respondents admitted to using the “Back” button before a page fully-loads.
The Usability Analysis Checklist gives you a template to follow when evaluating your site. There are so many aspects that contribute to usability that many optimization efforts are stalemated in this effort – the task becomes overwhelming.
That’s why this checklist is a godsend. It hits every single aspect of the site being evaluated and holds the information so you don’t need to barrel through the entire thing in one shot. Just do as much as you can and then go back to it later. Fresh eyes are much better than those that are just pushing through the template. Resist the urge to rush through the process; thoughtfully go through each section and assign ratings.
Rate each item using -1 for items that do not comply, 1 for items that do comply and 0 for items that partially comply. If an item on the Usability Analysis Checklist is irrelevant, leave the rating blank. Use the Comments section to record notes on your experience – did you notice that an animated ad was major distraction? Was there anything about the page that seemed out-of-place or could be enhanced?
The ratings you assign are rolled-up into the results and the entire site is assigned an overall score. The overall site score is a good reference point; but the real value is in the scores assigned to individual sections. Dive into the lowest performing areas to quickly bring-up the overall score and dramatically improve the usability of the site.
See Phase III: Clean Data Analysis here.

The Definitive No-BS Guide to Increasing Conversions
How to Kill It in the Conversion Game
100% Privacy. No BS. no games, no spam, When you signup.
we’ll keep you posted with a few emails per week